Saturday, September 15, 2012

Mom Made Ballet Bag

My 3 1/2 years old daughter was starting dance classes today. Nothing too fancy, just a class for toddlers, but they still have to wear a uniform (pink leotard, white tights and white canvas dance shoes). I really wanted her to have a bag for all her dance gear; when I went to buy her shoes at a local dance shop, I saw some really cute dance bags, but I found them a little expensive. Inspired by an Angelina Ballerina: The Next Steps episode (Angelina and the Must-Have Ballet Bag), I decided to make one myself!

Ballet Bag - Front

The bag is a simple tube shape with a zipper opening along the top. I used some leftover material from a Yukata I cut years ago (but have yet to assemble) for the shell - in pink of course - added two stripes of pink ribbons (from my stash) around the tube's circumference just for decoration, used leftover woven nylon strap from my own Irish Dance dress bag for the handle, and added a store bought embroidered letter (her initial) to the front of the bag.

Ballet Bag -Side

For the pattern, I used desert plates to draw each ends of the tube (to which I added a seam allowance), and then cut a rectangle for the main body of the bag that was my circumference by the length of the zipper I was using (plus seam allowance).

Ballet Bag - Lining

In the scraps bin of my favourite Fabricville, I found a piece of black woven nylon with PVC coating (usually for exterior uses) that was more that big enough for my needs (big enough for 2-3 bags) for just 0.75$. I cut the same pieces out of that material and used it to line my bag.

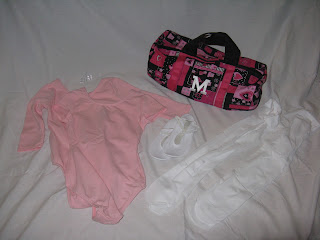
Ballet Bag and its content

I wanted a bag that was not too big for my toddler, but in which I could fit all of her stuff: two leotards, two pairs of tights, one pair of dance slippers and an elastic to tie her hair. This way, I can put everything away in that bag and not go hunting for any of these items on Saturday mornings. I also think it is good to keep an extra set on hand, in case of little accidents (she is toilet trained, but at that age, excitement may lead to incidents, so it is best to be prepared). There is also room in the bag for a water cup and a snack.

Daughter's first dance class

And this was my daughter this morning, after her first dance class, proudly sporting her uniform and standing next to her bag. She was so happy!

And the best the best thing about that bag of hers: it is unique! (Just like her). No one can ever mistakenly think it is theirs.

Saturday, January 7, 2012

Geeky Christmas QR Cross-Stitch

Back in October, I read on Epbot about a project Jen did mixing cross-stitching and scannable QR codes (Quick Craft: Geek Stitch). I loved the idea and decided to make something similar for my dad (a geek who loves his iPhone and all the apps), but for Christmas.

Finished Christmas QR Cross-Stitch

I found a QR Code Generator, entered the phrase I wanted (Joyeux Noël!) and used the jpeg that was generated for me to make my pattern in Excel. I also looked through Google Image for some Christmas-y border ideas. The border design changed throughout the process though because time was running short and I needed to finish. Which I did, just in time.

Framed Christmas QR Cross-Stitch

My dad's reaction was perfect: when he unwrapped the frame, he took out his iPhone, scanned the code and then burst out laughing. He kept on saying how cool this was and that it was definitely going on the wall of the family owned Auto Repair Shop. Even my mom commented on how nicely done my stitches were (and this was my first cross-stitch project).

This was my most time consuming project for this year's Handmade Holidays challenge (a personal challenge). But it was my favourite one!

Monday, January 2, 2012

Patchwork Table Runner

This is another one of the gifts I made this Christmas (how many am I at now?). This table runner was for my aunt and uncle who often give me gifts from Pier 1, so I was aiming for an "Ethnic" feel similar to what is sold there.

I cut 108 squares of various leftover fabrics (test me, I can tell you what project each of them came from), 5 cm x 5 cm (plus 1 cm seam allowance all around). I assembled strips of 6 squares, then sewed all the strips together.

The biggest problem I had was with the different levels of stretch each square had, since I used a variety of leftover fabrics including stretch velvet; I couldn't make my squares match up between strips.

Nonetheless, I made my entire table runner. Then I bag lined it with black cotton (another leftover). To make the patchwork hold nicely with the lining, I sewed a straight line of gold thread down each strip.

Finally, I hand sewed trim all around. The trim in question was tablet woven by yours truly usung 14 cards and a small tablet weaving loom. In fact, my loom only makes trim 150 cm long, so I needed 2 lengths to do the whole edge of the table runner.

I gave my gift to my aunt and uncle on New Year's Eve (they have their annual New Year's Eve bash on December 31st) and I do believe it was appreciated.